前回作成したものをベースに、Meshを回したいと思います。
HTMLとCSSは前回と同じです。
Meshを回す
window.addEventListener('load', init);

function init() {

    // レンダラーを作成
    const renderer = new THREE.WebGLRenderer({
        canvas: document.querySelector('#canvas'),
        antialias: true
    });

    // シーンを作成
    const scene = new THREE.Scene();

    // カメラを作成
    //const camera = new THREE.PerspectiveCamera(45, w / h, 1, 10000);
    const camera = new THREE.PerspectiveCamera(45, 1);
    camera.fov = 60;
    camera.position.set(0, 0, 1000);


    // 平行光源
    const directionalLight = new THREE.DirectionalLight(
        0xffffff, 1.5
    );
    directionalLight.position.set(1, 1, 20);
    // シーンに追加
    scene.add(directionalLight);

    // 立方体のジオメトリを作成(幅, 高さ, 奥行き)
    const geo = new THREE.BoxGeometry(300, 300, 300);

    // マテリアルを作成
    const mat = new THREE.MeshLambertMaterial({ color: 0xdc143c });

    // ジオメトリとマテリアルからメッシュを作成
    const mesh = new THREE.Mesh(geo, mat);
    // マテリアルを傾ける
    mesh.rotation.x = THREE.Math.DEG2RAD * 45;
    mesh.rotation.y = THREE.Math.DEG2RAD * 45;

    // メッシュをシーンに追加
    scene.add(mesh);


    // 初期化時に読み込まれる
    onResize();
    render();

    // リサイズイベント発生で実行
    window.addEventListener('resize', onResize);

    function onResize() {
        // サイズを取得
        const w = window.innerWidth;
        const h = window.innerHeight;
        // 描画サイズ
        renderer.setSize(w, h);
        // ピクセル比
        renderer.setPixelRatio(window.devicePixelRatio);
        // 空間の背景色 //0xから始まる16進数の色コード
        renderer.setClearColor(0xcce3ff);

        // カメラのアスペクト比を正す
        camera.aspect = w / h;
        camera.updateProjectionMatrix();
        //console.log('h'+ h + 'h'+ h);

        // レンダリング
        renderer.render(scene, camera);
    }

    function render() {
        // 次のフレームを要求
        requestAnimationFrame(render);

        // 回転
        mesh.rotation.x += 0.01;
        mesh.rotation.y += 0.05;

        // レンダリング
        renderer.render(scene, camera);
    }
}
前回のものに『function render()』を追加しました。
ここで毎フレームごとにx軸、Y軸を回転させ、毎フレームごとレンダリングしています。毎フレームごとにレンダリングなので、どうしても回転速度は環境によって違いが出できます。
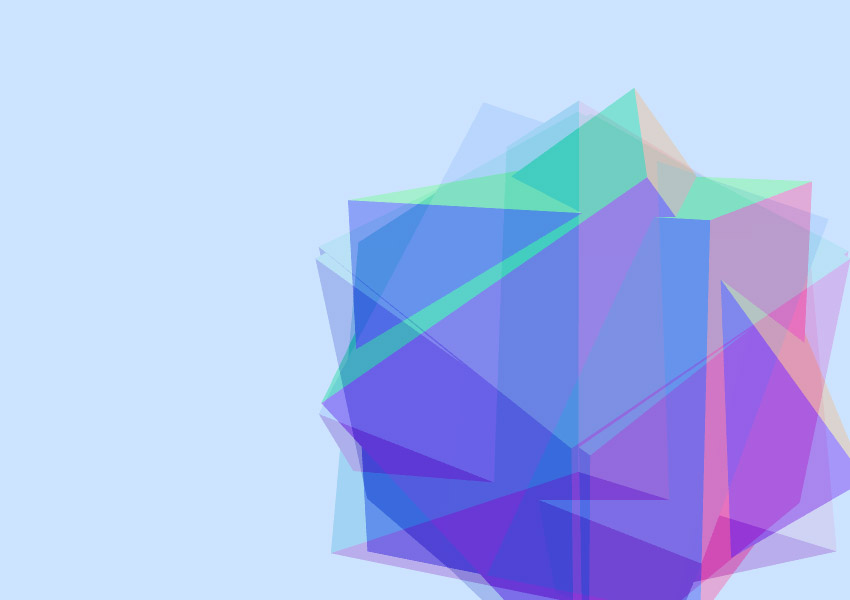
複数のMeshを回す
上で作ったものをベースにちょっと改造してみます。
HTML、CSSは同じものを使っています。
window.addEventListener('load', init);
function init() {
// レンダラーを作成
const renderer = new THREE.WebGLRenderer({
canvas: document.querySelector('#canvas'),
antialias: true
});
// シーンを作成
const scene = new THREE.Scene();
// カメラを作成
//const camera = new THREE.PerspectiveCamera(45, w / h, 1, 10000);
const camera = new THREE.PerspectiveCamera(45, 1);
camera.fov = 60;
camera.position.set(0, 0, 1000);
// 平行光源
const directionalLight = new THREE.DirectionalLight(
0xffffff, 1.5
);
directionalLight.position.set(1, 1, 20);
// シーンに追加
scene.add(directionalLight);
// 立方体のジオメトリを作成(幅, 高さ, 奥行き)
const geo1 = new THREE.BoxGeometry(300, 300, 300);
// マテリアルを作成
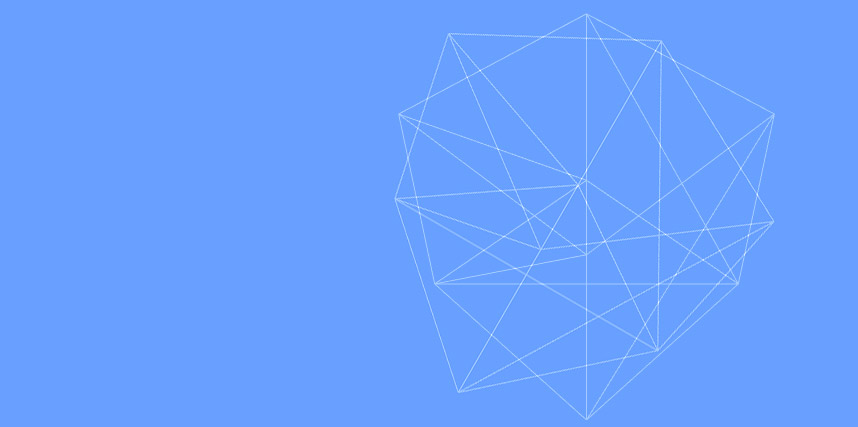
const mat1 = new THREE.MeshNormalMaterial({ color: 0xdc143c });
//const mat = new THREE.MeshBasicMaterial({ wireframe: true });
// ジオメトリとマテリアルからメッシュを作成
const mesh1 = new THREE.Mesh(geo1, mat1);
// マテリアルを傾ける
mesh1.rotation.x = THREE.Math.DEG2RAD * 45;
mesh1.rotation.y = THREE.Math.DEG2RAD * 45;
// メッシュをシーンに追加
scene.add(mesh1);
// 立方体のジオメトリを作成(幅, 高さ, 奥行き)
const geo2 = new THREE.BoxGeometry(300, 300, 300);
// マテリアルを作成
const mat2 = new THREE.MeshNormalMaterial({ color: 0xff1493 });
//const mat2 = new THREE.MeshBasicMaterial({ wireframe: true });
// ジオメトリとマテリアルからメッシュを作成
const mesh2 = new THREE.Mesh(geo2, mat2);
// マテリアルを傾ける
mesh2.rotation.x = THREE.Math.DEG2RAD * 45;
mesh2.rotation.y = THREE.Math.DEG2RAD * 45;
// メッシュをシーンに追加
scene.add(mesh2);
// 初期化時に読み込まれる
onResize();
render();
// リサイズイベント発生で実行
window.addEventListener('resize', onResize);
function onResize() {
// サイズを取得
const w = window.innerWidth;
const h = window.innerHeight;
// 描画サイズ
renderer.setSize(w, h);
// ピクセル比
renderer.setPixelRatio(window.devicePixelRatio);
// 空間の背景色 //0xから始まる16進数の色コード
renderer.setClearColor(0xcce3ff);
// カメラのアスペクト比を正す
camera.aspect = w / h;
camera.updateProjectionMatrix();
//console.log('h'+ h + 'h'+ h);
// レンダリング
renderer.render(scene, camera);
}
function render() {
// 次のフレームを要求
requestAnimationFrame(render);
// 回転
mesh1.rotation.x += 0.01;
mesh1.rotation.y += 0.05;
mesh2.rotation.x -= 0.03;
mesh2.rotation.y -= 0.08;
// レンダリング
renderer.render(scene, camera);
}
}
Meshの数を2つにして、片方のMeshを逆回転させてます。
それと、『THREE.MeshBasicMaterial』を『THREE.MeshLambertMaterial』に変えています。
Three.jsにBlenderで作ったオブジェクトを読み込む │ MUKOLOG
Three.jsにBlenderで作成したオブジェクトの読み込み方について。